When you set up Google Ads conversion tracking, it tells you if you are making money from your Google Ads—or wasting it.
If you are guessing whether your Google Ads are making you money, then you likely don’t have conversion tracking set up. If that’s the case, you’re in luck because this post will show you how.
What is Google Ads Conversion Tracking?
A conversion is any action you want people to take on your website. For example, on an e-commerce site, you want people to buy something; on a lead generation site, you want a customer to connect with you through form completions, phone clicks, or email clicks on the website.
Google Ads conversion tracking tells you if any of those things happened from your Ads.
The real power or Google Ads Conversion Tracking
Google Ads provides powerful conversion tracking on many different levels across your account, campaign, and ad group, including:
- The whole account
- A specific campaign
- An ad group
- A keyword
- An ad
- By device
- By location
- And more.
In other words, conversion tracking is versatile enough to allow you to see your data from a big picture level, right down to a detailed, granular level.
Four Types of Google Ads Conversion Tracking
Google Ads has four different types of conversion tracking that allow for multiple conditions:
- App, for those that sell apps
- Website
- Phone calls
- Import conversions from other applications like Google Analytics’
![]()
Let’s go through the pros and cons and discuss how to set each up each of these.
Before we choose one, let’s navigate to Conversion Tracking in your Google Ads account:
The first step to setting up Google Ads conversion tracking
To create a Google Ads conversion, log into your Google Ads account, and in the top navigation click on the ‘wrench’ icon which is ‘Tools’.
On the dropdown menu, click ‘Conversions.’
A screen opens with your existing conversions. If you are using ‘Smart Mode,’ you will see a bunch of ‘Google-made’ conversions, but we know from the ‘Smart Mode’ training video these are weak conversions.
To get conversions that are customized to your business, we’ll need to make our own.
To make your conversions, click the blue ‘+’ (plus sign) and the screen with the four conversion methods will open.
Google Ads Conversion Tracking: Phone Calls
There are three types of phone conversions you can use in Google Ads:
- Calls from ads using call extensions or call-only ads.
- Calls from a phone number on your website.
- Clicks on your phone number from your mobile website.
You can choose one or all of them for your business.
Calls from ads using call extensions or call-only ads
This is the easiest call conversion to set up. Your phone number shows in the ad just like the image below. When mobile users click on the phone number, they call your business directly, bypassing your website completely. That’s why we need a separate conversion tracking for calls.

To begin, navigate to Call Conversions (Tools & Settings > Measurement > Conversions). Click ‘New Conversion’ in blue.
Click the ‘Phone Calls’ box, and a menu opens to choose the source of your call conversion. Check ‘Calls from ads using call extensions or call-only ads’ and then ‘continue.’
You will be taken to a conversion action that needs to be completed. The default settings should work well, except the last item: ‘Attribution model’. Attribution is a very inexact science, so businesses large and small grapple with it.
Google recommends ‘Data-Driven,’ because it calculates the contribution of each interaction with your ads. However, we are tracking single phone calls, so my preference is to change the attribution to ‘Last Click,’ which gives all the conversion credit to the ad the user clicked.
Finally click, ‘Create and Continue’.
Google will confirm that the conversion has been successfully created. Click ‘Done’.
Turn On Call Tracking
The final step is to ‘turn on’ Call Reporting in your Google Ads Account settings.
- In the left menu of your Google Ads account, click ‘Settings’.
- Click, Account.
- Open ‘call reporting’.
- Click ‘Get detailed information about calls you’ve received,’ which will enable your call reporting.
- Click ‘Save’ in the bottom right.
You can now consider your call conversions set up and complete. If you wish to go deeper with call tracking in Google ads, we can quickly look at the other call conversion options:
Calls from phone numbers on your website
The thing to note here is that Google makes this conversion tracking look and sound very easy. Google uses dynamically generated phone numbers, which means the phone number that appears on your website changes each time a new user clicks your ad through to your website. But these call conversions will require you to put code directly into the html code of your website. If you are not familiar with HTML, it is likely best to involve your website developer or webmaster in these conversions.
Calls to a phone number on your website or your mobile website has a similar screen to the set up we looked at with call extensions. The difference is you must input your phone information here.
You will then be presented with your website code installation options. This is the part where your developer or webmaster should take over. Have them install the code on your website.
Google Ads Conversion Tracking: Import from Google Analytics (GA4)
One of the most efficient conversion tracking methods is to import conversions from your GA4 (Google Analytics 4) account.
Advantages of Importing Conversions from GA4
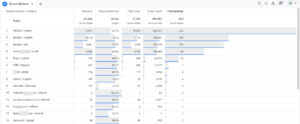
Looking at all your conversions in one application, such as GA4, enables easy comparison of different traffic sources. For example, the screenshot below compares the performance of multiple traffic sources without having to toggle between screens or applications.
Check these before you try to import from GA4 to your Ads account
Before you import your conversions from Google Analytics to Google Ads, two things must be done:
- Link your Google Ads and Google Analytics accounts (do this in Analytics).
- Make sure to have configured your conversions in Google Analytics.
How to link your GA4 and Google Ads accounts
From your Google Analytics 4 account, click the Admin button in the bottom left.
In the right panel, scroll down to ‘Google Ads Links’ and follow the prompts.
Have conversions configured in Google Analytics
If you have not configured your Analytics conversions, follow the instructions here. [Link to conversion tracking post]
Importing Conversions
Open your Google Ads account and go to the conversion menu, which is in the Tools section (the Tools icon looks like a wrench). From here, select Conversions > the ‘+’ (plus sign) > Import Square.
From the import options that appear, select ‘Google Analytics 4 properties’ and then check the website button. Click ‘Continue’ on the left.
You will see all of your Google Analytics 4 goals listed. Check the boxes beside each one you want to import.
Check the ‘import and continue’ button. That’s it!
Your conversions will be tracking in Google ads!
Website Conversions
In this video, we’ll talk about Conversion Tracking using the Website Conversion method. This tracking method is more technical than others because you must load a piece of code on your website. That code must be placed where the conversion happens. For this reason, I suggest reaching out to your developer or webmaster to properly insert the code.
To begin, let’s go to the Add Conversion page. This time, we will click on ‘Website Conversions,’ The New Conversion Action screen will open.
First, we choose a conversion category from the dropdown list. For this example, I will choose ‘Submit lead form’. As you can see, it automatically populates the conversion name.
I recommend giving your conversion a value of $1.00, because it keeps the math simple when doing analysis later.
I generally leave the rest of the default settings in place and click ‘Create and Continue’ here in the bottom left.
This is where the technical fun begins. You must get some code installed on your website pages where the conversions happen. In fact, you must place this code on the website pages within the HTML code precisely where the conversion is triggered.
There are three methods you can use to install the code on your website:
- Do it yourself: Google will provide the code in a downloadable format, and you insert to your website’s HTML. I only recommend this if you are comfortable with inserting code into your website.
- Email: Use the email form provided by the tag to send the tag to a web developer for insertion to your website.
- Use Google Tag Manger: This is a free product from Google that inserts tags on websites.
Select the method you wish to use and then follow the instructions.
Once the code is inserted on your site, it will begin tracking your conversions.