![]()
Contact us conversion tracking counts the number of sales leads your business generates from your website. Just about every website offers a method for people to connect. How does your website ask people to connect with your business – A form, clicking an email or phone number, maybe all three?
If you want to know how many times these connection methods are used, this post is for you. It will show you step by step how to track form completions, phone and email clicks using Google Analytics.
Prerequisite of Contact Us Conversion Tracking.
Before getting into the details, make sure you have properly installed Google Analytics 4 and in Google Tag Manager you have set your GA4 configuration tag. If not follow the instructions on Google Analytics Installation Guide and then return to this post.
Phone and Email Click Tracking
Let’s start with phone clicks. Before we configure this in Tag Manager, we need to ensure your phone number is clickable.
Steps summary:
- Check phone number on your website is clickable
- Configure Tag
- Set Trigger
- Test the tags work
Check phone and email links are clickable
Before we open Google Tag Manager, we need to check that there is a phone and email link on your website. On a desktop computer, move the mouse over the phone number, and if it changes from an arrow to a finger pointing, the link is clickable. That’s good!
Do the same with an email address on your website. Hover over the email, and if the mouse becomes a pointing finger, the link is clickable. Again, this is good.
If the links are not clickable
If your email and phone number are not clickable, contact your website developer ask them to make these assets clickable. Be sure they make all instances your phone number and email address clickable!
Create your phone and email tags
Once you are certain your phone and email links are clickable, you are ready to make your tags. Here’s how:
- Log into your Google Tag Manager. You should be taken to the ‘Workspace’ area. On the left menu, click ‘Tags’ and then ‘New’ on the right.
- A new tag configuration will appear. At the top left, give the tag a name: you can name it what you wish. For this example, I chose ‘Contact Phone Number’.
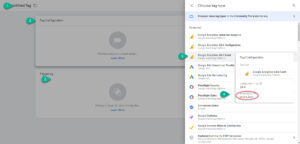
- Next, click the ‘Tag Configuration’ area. A menu appears to choose your tag type. This will be a Google Analytics GA4 Event, so we will click that.
- Configuration Tag is your Google Analytics Measurement ID, which should be set up. Click the drop down, and then click the ID. This tells Tag Manager to send the click information to your Google Analytics 4 account.
Name the event: You can use any name you wish, but I recommend something you will recognize when analyzing data in Google Analytics. For this example, I use ‘phone_lead,’ because that identifies the click as a ‘lead’ and the lead came by ‘phone’.
Since this is a simple tag, I usually skip Event Parameters, User Properties, and Advanced Settings.
Set the Triggers for the phone and email tags
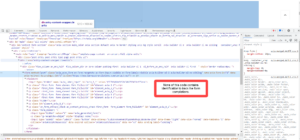
![]() This brings us to ‘Triggering’. Most tags have a trigger. The trigger identifies the rules, or criteria, that must be met for the tag to work.
This brings us to ‘Triggering’. Most tags have a trigger. The trigger identifies the rules, or criteria, that must be met for the tag to work.
- Click in the ‘Triggering’ section where you will probably have a few triggers, including the ‘All Pages’ trigger, showing. These triggers were created automatically by Google. For what we are doing, we need to create a new trigger:
- Click the blue ‘+’ (plus) sign in the top right corner. We are now creating the trigger for the phone call clicks tag.
- In the top left corner, give the trigger a title. To make triggers easy to associate with tags, I suggest using the same name as your tag. Since the tag is called ‘Contact Phone Number’, give the trigger the same name.
- Next, click the ‘Trigger Configuration’ area, and the ‘Choose trigger type’ menu appears. This menu contains Google Tag Manager’s pre-configured trigger types. As you can see, there are several of them to choose from.
- Since the phone number is a link (remember, we had to hover over the phone number to see if a link existed?) We will choose ‘Just Links’.
- Skip ‘Wait for Tags’ and ‘Check Validation’.
- Under ‘This trigger fires on,’ the ‘All Link Clicks’ option is checked by default. However, we only want our trigger to fire on links related to the phone number, so check ‘Some Link Clicks.’
- There are three boxes that need to be completed: In the first box, click the dropdown menu and select ‘Click URL’. In the second box, click the drop down and select ‘Contains’, and then in the far left box, enter: ‘tel:’. This is the html code that makes your phone number clickable.
- Click ‘Save’ to save the trigger, then click ‘Save’ in the upper right corner.
You have completed making a Phone Click Tag!
Test that the Tags Work
- Click the ‘Preview’ button, and then the blue ‘Connect’ button.
- Once connected, find a phone number on your website, and click on it.
- Move to the ‘Tag Assistant (Connected)’ tab that automatically opened. Look for the ‘Phone Lead’ tag in the ‘Tags that fired’ section.
- If the tag fired, close the two preview browser tabs.
Email Link Tag
![]()
The email link tag will be almost identical to the phone tag. In fact, you can copy the phone tag and phone trigger.
Start with copying the trigger
- Change the trigger name in the top left to ‘email_lead,’ and then open the click URL box. The box on the right says ‘tel:’. Change that to ‘mailto:’ and click save in the top right. Your email trigger is complete.
- Return to the main workspace screen and in the left menu click ‘Tags’.
- Find the ‘phone_lead’ tag and open it. Find the three stacked dots on the right and click ‘Copy’.
- Change the tag name to ‘Email Lead’.
- Change the event name to ‘Email_lead’
- Click on the ‘triggering’ area and you will see the phone trigger appear. Remove that by clicking the minus sign.
- Click the plus sign, and then click on the email trigger. Click save.
Now perform a preview to ensure the tag works.
If the tag works, click the blue ‘Submit’ button in the top right.
Form Tagging
You probably have some type of contact form on your website. This section shows some ways to tag your forms, so the number of completions is reported in your Google Analytics.
The form tracking shown in this post is for very simple forms that can use Google Tag Manager’s pre-configured form variables, such as Form ID and Form Class.
What you need for Form Tagging
Before we start, you should be using a Chrome browser because that makes it easier to find elements of code we will need.
- Have your website open on a page with your form.
- Open another tab and make sure you are logged into your Google Tag Manager Account and on the Workspace screen.
Check what you can see behind the form
We need to determine if we can create the form tag ourselves, or if a developer needs to become involved. This requires looking at the code managing forms on your website. Don’t worry, it’s not as scary as it sounds.
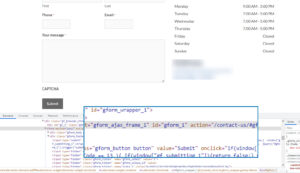
- Go to any form on your website and locate the submit button.
- Right click on the submit button
- If you are using the Google Chrome browser, at the bottom of your screen will be a lot of code.
Look through that for either ‘form ID, or ‘form class’. If you find either of those items, we should be able to build the form tag.
Cannot find either Form ID or Form Class
If you cannot find either ‘form ID’, or ‘form class’, this post will not be able to help you. You should contact your website developer and engage their assistance. Most developers can get this type of thing done in a couple of hours.
You Found either form ID or Form Class
Keep reading! You are almost finished setting up conversion tracking, and your form can easily be tracked. Follow the instructions below:
Enable Google Tag Manager Built-In Form Variables
We need to enable all the form variables ‘Form ID’ and ‘Form Class so we can use them as needed to configure our trigger.
From the Google Tag Manager ‘Workspace Screen’:
- Click ‘Variables’ in the left menu.
- A new menu pops out on the right side of your screen. Scroll down that menu until you see ‘Forms’. This shows you all Tag Manager’s built-in form variables that can be used to capture information.
- It’s harmless to check off all the form boxes, but you really only need ‘Form Class’ and ‘Form ID’. Notice to the left, each of the checked form variables are added to the list of enabled variables. These are all ready for use.
- To close the variables menu, click the ‘X’ at the top of this menu.
Build the From Trigger
- On the left menu, click triggers. We are going to build the rules for the form tag.
- Click ‘New’ in the upper right
- Name the trigger ‘Lead Form Trigger’
- Click the ‘Trigger Configuration’ area; the ‘Choose trigger type’ menu pops out.
- Click ‘Form Submission’.
- Leave the ‘Wait for Tags’ box unchecked.
- Check the ‘Check Validation’ box, which opens an additional configuration. The check validation means the form must be completed, or the tag will not work/fire. It prevents the tag from firing when users do not properly complete the form.
- Now we are going to set up the ‘Check Validation’ boxes. Starting with the far left box, click the down arrow and find ‘Page URL’. If you cannot find ‘Page URL’, click ‘Choose Built-in Variable’ at the bottom of the dropdown menu, and then find ‘Page URL’.
- In second box, click the down arrow, and find ‘matches RegEx’.
- In the third box, enter ‘.*’ (that’s a dot with an asterisk).
- The next section is ‘This trigger fires on’. Check ‘Some Forms.’
- Starting with the left box, select either ‘Form Classes’ or ‘Form ID, whichever one you found when looking at the form code.
- In the next box, select ‘Contains.’
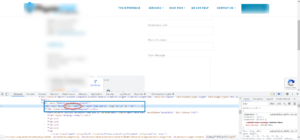
- Open the tab with your website form and go to the form submission button.
- Return to your website form code, and copy either the form class or form Id, whichever one you have. Paste this into the last box on the right.
- Click save at the top.
Build The Tag
- Next, we need to make the tag. Click on ‘Tags’ on the left menu and then ‘New’ in the upper right.
- Name the tag ‘Lead Form’.
- Click the tag configuration area, and from the menu on the right, select ‘Google Analytics: GA4 Event.’
- Add your GA4 Configuration ID
- Under ‘Event Name,’ input ‘form_submission_lead’.
- Click the ‘Trigger’ area and click on the form trigger we just made ‘Lead Form Trigger.’
- Click save.
Form Testing
So, let’s see if what we did works, like we did with the phone and email tags.
- In the top right corner, click ‘Preview’, then ‘Connect.
- Navigate to the page with your form and complete the form.
- Go to the ‘Tag Assistant [Connected]’ tab and see if the tag fired.
If the tag fired, congratulations, tag is working!
If the tag did not fire, we need to revisit the trigger and try a new input:
- Close the preview tabs and return to your Tag Manager workspace home.
- Click ‘Triggers’ in the left menu.
- Open the form trigger.
- In the box where we have ‘Form Classes,’ click the drop down and select ‘Form ID.’
- Return to the tab with your web form open, right click the submission button, and look for ‘id=’ and copy the words / numbers that follow. Paste that information in the far right box back on the form trigger.
- Save the trigger and click the preview button and repeat the process of completing your form and identifying if the tag fired.
- If the tag fired, click save. And then ‘Publish’ in the top right corner.
What to do if struggling to get form tracking to work
If the tag did not fire, it is alright. Remember, forms are the trickiest item to configure. You may want to consider hiring someone to build your form tag or change your form provider.
On the other hand if you insist on learning how to do this yourself Analytics Mania has a very helpful blog. One post in particular is all about forms. There’s lots of helpful information on the website.
For WordPress websites, Gravity Forms is an excellent form management choice. There is a ton of flexibility to collect valuable information, and it’s very easy to track form completions with Tag Manager. However, it’s not free!
Setting Conversions in GA4
The good news is, that technical ‘heavy lifting’ is now done. The final step in conversion tracking set up is to ‘tell’ Google Analytics your conversions. When someone on your website clicks your phone number or email address, or completes your form, we want Google to count those actions as conversions.
We just need to tell that to Google Analytics, and that’s easy.
Before you can set your conversions in GA4, go on your website and click a phone number, click an email, and complete a form. This ensures that all three happened on your website. Then, wait 24 hours.
After 24 hours, you’re ready to set your conversions:
Log into your Google Analytics Account. Make sure you are looking at the GA4 Property. The ID number will be only numbers, no letters.
- On the far left menu there are icons. Hover your mouse over those icons and click on ‘Configure’.
- You should now see all the events from your website. We are only interested in those we configured in Tag Manager. Remember, we gave each of those events a name:
- Phone Clicks: phone_lead
- Email Clicks: Email_lead
- Form Completions: form_submission_lead
Look for each of these event names in the chart.
- In the far right column, you will see ‘Mark as conversion’. Make sure that button is turned on for phone clicks, email clicks and form completions.
- If you do not see these events listed, return to your website and perform each of these events on your website. Wait 24 hours, and then return to this page and mark the conversions.
Congratulations, now you are all set with conversion tracking!